ABOUT THE SHOW

ALL HANDS ON DECKS is the first custom skate deck group gallery show being presented at the American Greetings World Headquarters Creative Gallery in Cleveland, Ohio.

Saturday, January 10, 2009

Work in progress


Here's a detail of what I've been up to...I haven't painted in a really really long time so I think this is a good way to get back into it.

The 1st idea


I originally started with this image and put some hours in on paining it.  I didn't take a picture of it right before I sanded it all off.  Lets just say the acrylic paints got thick, chaos ensued and the palm sander did what it does best.

When I'm not shoveling.......

My Saturday progress between shoveling snow every 10 min.  I spray painted a piece of cardboard with white and stamped the corrugation onto my flat black deck. Created a kinda cool corduroy effect.  I spray painted more primer on in the shape of my character and then started painting it pink.  The rest requires a few more spots needing to be painted with acrylics, then finish off all the line art with paint pens.

Another Poster


This one will go up on some of the columns at work. I wanted to get everyone's name up on the poster big enough and in a way that people would stop to see if they recognize any names. I'll see if I can get these printed at work, otherwise I'll have to hit up Kinkos and burn a few on their large format laser printer. It's like 17 cents a sq foot which isn't bad. Final size will be about 17 inches x 5 feet and I'll start getting them up Tuesday.
I just finished another deck tonight called "Weapon of Masked Consumption". Didn't come out exactly like I wanted but I'm not going to obsess over it. I'm going to move onto another deck "Boom Board" and maybe do another poster this weekend. We'll see how it works out.

One for the Ladies


Ladies First. These images shows some masking and lettering reveal after the tape is removed.
Board is painted white. Lettering is spraypaint. Pink to red gradient. I will add an image to the board next. Probably finish off with some sort of clear coat. Getting there! -K Carr

Bored Devil


Making some progress. I hope to have it finished today! Wish me luck. - mANGORN

Dave Savage comes through with a show poster.

Not only will Dave Savage have 2 decks in the show but he also hooked us up with a hot poster this weekend.


Mr Savage is a super talented fellow and currently available for freelance / full-time work, private parties, and referee at your next sorority tickle fight.

Hit him up at savagemonsters.com.

C'ing double

Here's a sneak peak at board #3. First and last you'll see it until the show. Sorry for the blurry pic.


Masked with frisket film, cut each C and sprayed it flat black. This is only phase one.

Friday, January 9, 2009

Sneak Peek


City of Gears:

Here's a sneak peak of a small section of my board:)

Glue ended up on more than the deck...


...But my drawing is successfully affixed.

Now, for the paint!

Wheat Waste.

Well, at least I tried. Off to a nice early start around midnite tonight to start glueing the prints down. Mixed my glue, drew some guides on the board.


Eh. The paper started to fall apart around the edges and was getting messy overall. The glue was also beading up, which lead me to believe the surface may not have been sanded enough too. So it was looking kinda lumpy and sloppy. Not the effect I saw for this.


After a quick im pow wow with Keith, who is always good for advice, I decided to paint as much of the black as possible and only use the cut out faces. So I cleaned off the board, luckily the glue hadn't set. The plan is to dust them with primer, glue down the faces and paint the rest by hand.

My primer was in the garage, so it was freezing cold. Brought it in the house to warm up overnight and will hit them in the am.

Bug Photoshop Mock


This is a Photoshop mock that Keith made for me suggesting to possibly even cut more away on the one side and I just may do that. We will probably cut some tracks in it similar to the mock as well. I may make him do it though, not sure I have the guts to do it.

92 C's

Sing it with me!!!

92 images of C's on a board... 92 images of C's. If one of those C's gets cut from the board, 91 C's left to cut on the board.

I want to wrap this one up quick. Something jumped out of the dumpster after work today that I need to make a deck with.

Thursday, January 8, 2009

More Bug Progress


Well here's the front section in progress. There are more too add yet besides the ones that are indicated in white. The ones on the side and bottom are done. There's probably about 10 more to go then I have to indicate shadows somehow. I also may add some more cut away tracks by the bugs and just cut a huge section away on the side. Keith had a good idea there.

Going with this one.


I've gone through one idea already which was sanded off last night (way overthinking it). I'm thinking this will be the keeper. The board is sanded and primed, again. Going to use a combination of spraypaint, paint-pens, and acrylic paint.

Monsters! progress

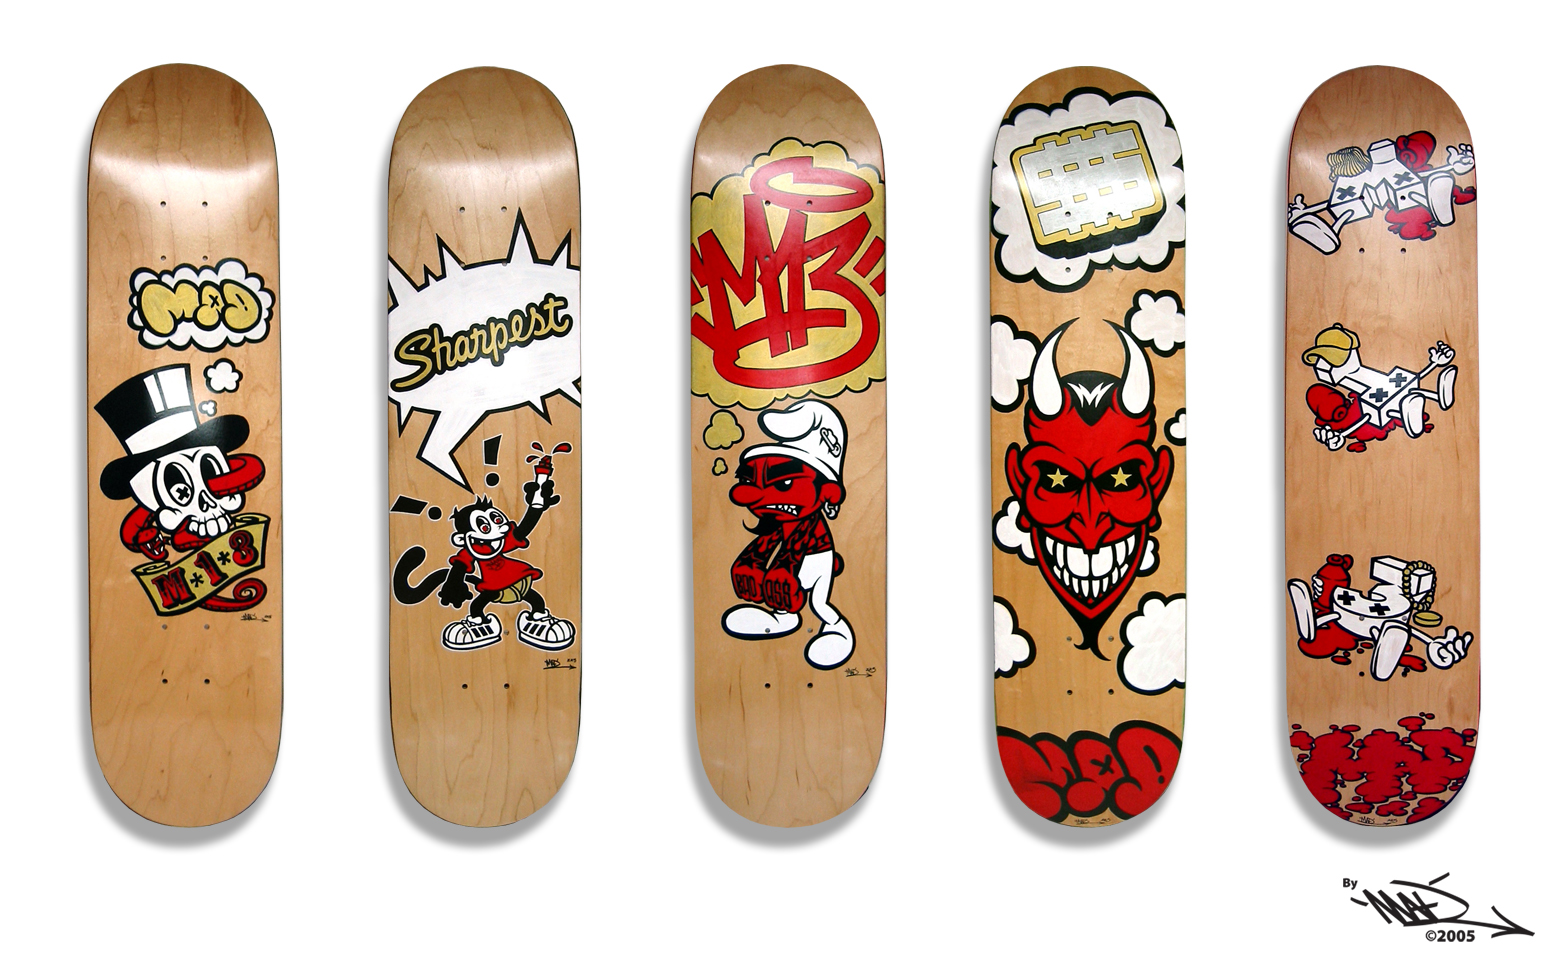
Going for the triptic! I received my boards and prints today. I also decided to go the wheatpaste route on this instead of a transfer. Lightly sanded the boards to remove the varnish, and cut out the images tonight. Once I glue down the images, I will be painting around the faces, and doing the type and splatters by hand. I will probably paint over the prints in some places as well. I want to get the black as rich as I can, and maybe highlight a few areas. Probably start the wheatpaste tomorrow night. Never did it before, should be interesting...

Wednesday, January 7, 2009

Darth Mauled In Progress

Tonight I set my son up with some acrylics, brushes and tricks of the trade. He primed the deck with only a little help from me (like pointing the spray paint in the right direction) and then transferred the image onto the deck with some transfer paper. Once I explained what was going to be red and what was black it was paint-by-numbers time.

So... focused...


I'll likely have to help him with some of the line work but rather not. Maybe we'll mask up the black and he'll wrap it up unaided. Thad would be cool. As much as I like things a certain way, I want to give him as little assistance as possible.

Another Show Poster

Another quickie. I wish I could spend more then 20 minutes on these. The fonts could use some work and overall a little more distressing to make it believable but for a quickie, not bad.

I'm not sure it's as ironic a sign as I was going for, but it'll work.

Silicone is stinky.

Tonight I got a few things done.
  1. Sanded and primed my son's Darth Mauled deck.
  2. Pasted up a few broken deck signs.
  3. Made a new mold for casting clear resin wheels for my 'Bling Is Dead' piece.

Here's a couple of photos of the process on the ghetto mold making.

Chris Ryniak told me I could make a 'dump mold' for my needs. I picked up some alginate for the mold and some clear casting resin only to find out that you can't use alginate as water and resin don't mix.

Finding professional grade stuff locally here in Cleveland is like finding the secret to happiness. Add to that the fact that I have a lot I want to do on a VERY limited budget and timeframe and you get all the makings of a MacGuyver episode.

RTV molding silicone is expensive so after a little interweb research I found out you can make a mold from silicone caulk. It's generally frowned upon by people who know what they're doing... but since I don't, full speed ahead to Home Depot!

To sum it up, you brush on a coat of silicone onto the part you want to mold. Let that cure. Then the wierdness begins.

Get your hands wet with dish washing liquid soapy water, squirt some silicone into a bucket of water and knead it. You're basically rinsing out some of the chemicals which I assume slow the curing process and make the silicone all sticky and gross.

The rinsed silicone comes out of the water like a thick jelly. Just mold that goop around the part (which you put down on something smooth) and build up your mold. You end up with something like this. There's a skateboard wheel in there somewhere...

Once that cures, which happens amazingly fast compared to silicone right out of the tube, You wiggle it off the plexiglass and flip it over.

Time for some trimming because I'm impatient!


At the risk of ruining the mold I decided to let it cure overnight and blog to keep my mind off the fact that I want to pull the master out, mix up some resin and start casting!

Stay tuned and get those decks done! Just make it up as you go along. It's what I do. :)

Tuesday, January 6, 2009

TECHNIQUE : 'wheat' pasting on your deck

This one is pretty easy but I've been asked how to do it so I took some photos tonight while making some signage for the show.

The good thing about using this technique is that you can print something as a guide you've designed on the computer and then paint over it once it's dried.

Gather your materials. Basic elmers glue watered down about 50:50 or modge-podge (if you want to get fancy and spend money), a junk brush or spreader, the thing you're applying and the thing you're applying it to. It's probably a good idea to put down some paper. (Giant gumball machine in the kitchen is optional.)

The difference with Modge Podge is more then the price. You can get it in a variety of finishes. Gloss, Semi, Matte. They even have glitter, glow in the dark, etc etc etc.

First, spread some glue on the back of your artwork. You need to get the paper wet before applying or you're going to end up with a wrinkled mess when you try to apply it dry to a wet substrate.


Next, get your deck (or whatever you're using) completely wet with glue.

Lay your artwork down on the board while both surfaces are still wet. Lay it from one end to the other smoothing it out fairly well as you go. If you're looking to wrinkle it purposely, now it the time to do it. I'm going for a smooth application here.

Once you get your art where you want it, spread some glue on the top side and begin to smooth out the art from the center outwards. You can use the brush, a squeegee, your hand, whatever.


At this point, while it's all still wet, you can distress things a little by simply rubbing spots you want to distress. In this case I did double duty by rubbing the edges trimming and distressing at the same time.

...and there you have it.

I knocked out three of these in about 15 minutes including taking photos. The Emler's glue dries clear with a matte finish. I assume you can paint right over it but haven't tried it.

So what are you waiting for? Get crackin' on those decks... the clock is tickin'! :)

So what we put progress up here or something?


Line art. That's all you get till....later.

Submission guidelines

Just wanted to clarify.

All decks are due during next week. The final day to submit your finished deck for inclusion in the show is noon on FRIDAY, JANUARY 16!

  • We will be hanging the boards using fishing line through the top holes, tying it in the back and hanging them on a nail. If you require an alternate hanging method please submit your art ready to hang.
  • Please attach a piece of paper to the back of your piece with your name, title of the piece, and asking price (or NFS)
  • It's late to remind but I'm mentioning this again so your deck makes it into the show. No nudity, profanity, weapons or other potentially offensive subject matter. The Gallery Comittee WILL pull the piece.

You can begin to submit your decks to me as they are finished beginning today.

If you are mailing your deck, express it to:

Keith Corcoran
AG Interactive
1 American Road
Cleveland OH 44144

I'll be prepping the gallery and hanging the show on Saturday and Sunday (17th & 18th). It will be a lot of work because I'd like to transform the gallery similar to how I did for my show last year.

If you're available and willing to help, please let me know. I will be sending out specifics by the end of the week. It's our show, let's make it hot, exciting and unique!

Looking forward to seeing all the decks.

before & after...

so, here i was... the deck was placed right by my guitar hero guitar and rock band. I was going to do something else with the board first, but when i looked at it, it's about the size of these toy guitars. well, i decided to trim the guitar and make a guitar out of it. (FYI, i wasn't able to post animated gif for some reason.)


obviously, I’m not done… but I decided to post some images on my progress.

More Broken Deck Signage and other updates

After creating a silicone mold to cast some clear resin skateboard wheels with embedded crystals I tore apart the office chair I got from the dumpster today. I'll have to work on this one at over the weekend in the garage.

While I'm waiting for resin to cure I did another quick signage design tonight. I was going for the sticker collage look. I'll print this out tomorrow and paste it on a couple of broken decks and figure out where to put them around the building. Guerilla marketing starts on Monday.

I should have an email going out to participants tomorrow with some gallery guidelines, deadline information and other stuff.


Monday, January 5, 2009

Zombie Cupcakes

did some quick sketches while waiting for a meeting to start...


will probably do collage with acrylics and maybe some patterns from magazine clippings.

Too many ideas, too little time.

We'll see how ambitious I get. I might decide to make a couple of low-priced pieces for the show if I have time. Here's an idea from Kevin Carr I just mocked up supaquicklike. Would be easy to execute and likely look better then this.


Also, I found 2 rolling office chairs in the dumpster today at work. I'll pull them apart tonight and see it I can use them for some custom skate deck furniture. I'd rather not have people rolling across the floor in the gallery so I might opt to make them non-rolling. we'll see.

Just a Glimpse

I may be in over my head already, but here's a detail from my layout/color study image. Who knows how detailed I'll get in the actual final piece - I get the feeling I may be starting out with too much cheerful ambition!


As a novice, I must ask: Can anyone recommend an appropriate varnish? Is there a good one to use with acrylics vs. oil? Thanks!

Banging out promo materials

It seems I have more broken decks then I probably have time to use so Tom Page had an idea to use some as signage to promote the show. Done.

Going to be pasting some quickly designed posters onto broken decks and putting them around the building this week and next.

Here's the first quick design. These will all be quickies and mostly all different. The impact will lie in the novelty of the presentation.

If you want to do one, make it about 16x8.5 inches @ 150 dpi with about a 1 inch safe area on the left, top and bottom to allow for trimming when I put it on the deck. Then, send me a jpg.


Sunday, January 4, 2009

Monsters!


Well I finally had some time to really sit down to figure out what to do last night, thanks to constant pestering by my buddy Keith. Happy Birthday by the way...

Anyway, my inspiration was a sticker I bought at a roadside stop in Italy in 2003. Along with all racks of sugary goodies whose names I couldn't pronounce all that well, but should being Italian, was a rack of stickers. One of which was a really cool, black and white Boris Karloff as Frankenstein. I mounted the sticker at the time on a red background and put it on foamcore. It's been on my office wall ever since. I grew up as a Famous Monsters reading fanatic, though the obsession has wained over the years, I still love the classic faces and imagery of those pre-CGI monsters and ghouls.

So there it was.

With some quick google image searching, I found my source image around 12:30am and went to work, while chatting with Keith on im. Couple of hours later and here we are. Just figuring out how I am executing now, probably going to do a transfer or a large format print and glue down over a painted bg. However, I may be doing a triptic now with some broken boards. Got two other ghouls picked out. Need to work them up tonight. Nothing like biting off more than you can chew...

Calling it done

It could have used  another dozen layers on it, but I think it's done enough.  Still need to Gloss-coat it.

Image transfer techniques

There are plenty of ways to transfer an image from a laser jet or inkjet print. Laser printer transfers actually work really well on fabrics from my experience. That said, not sure how it would work on a deck but if you're stuck and willing to experiment, here you go.

Followers